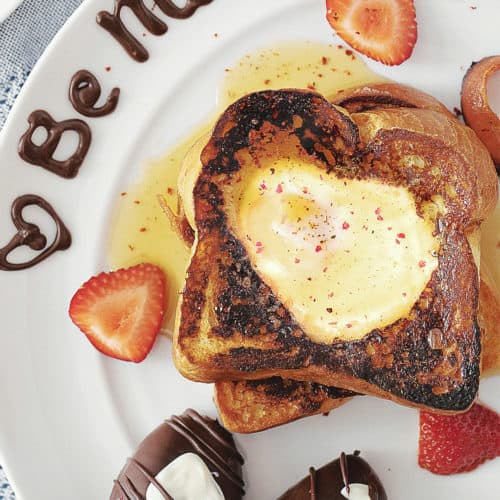
Egg In The Hole French Toast
This recipe is delicious and easy. You can forego the egg in the hole option if you want and still serve a fabulous French toast breakfast. The instructions appear long but I walk you through how to make the chocolate covered strawberries as well in the Notes section of the printable recipe. Also, the recipe is written for two servings. If you want to double the recipe, only double the bread and the eggs used in the Egg In The Hole. The milk and egg batter mixture listed below will be enough for dunking about six extra pieces of bread.
Servings: 2 people
Calories: 350kcal
Equipment
- Electric Griddle
- Mixing Bowl
- Cookie or biscuit cutter
- Wide spatula for turning
- Baking sheet
Ingredients
- 6 slices bread, sliced 1-inch thick, Brioche, Texas toast, or French bread
- 3 large eggs, (2 for the egg in hole, one for your French toast batter)
- 1 Tbsp all-purpose flour, or gluten-free if needed
- 1 Tbsp granulated sugar
- 2 cups whole milk, or almond milk, or half and half for decadence
- ½ tsp cayenne pepper, optional
- ½ tsp black pepper, freshly ground, optional
- 1 dash salt
- maple syrup, warm
- berries
- butter, for frying
Instructions
- Preheat oven to 300F° to be able to keep the French toast warm while finishing the Egg In the Hole pieces.
- Using a 3" cookie cutter, biscuit cutter, or glass (whatever size will cut into the bread but still leave enough of the bread around the hole to stay together), cut a hole in the center of two slices of bread. Save the piece of bread you cut out if desired, especially if using a heart-shaped cutter. Set aside.
- In a medium bowl, add one egg. Sprinkle the egg with 1 Tablespoon flour and 1 Tablespoon sugar and whisk with a fork to combine. Add 2 cups milk, ½ teaspoon black pepper, ½ teaspoon cayenne, and dash of salt. Whisk very well to fully incorporate the egg and milk.
- Heat the griddle to 325F°-350F° depending on how hot your griddle cooks. Melt a generous amount of butter on the griddle. Working quickly, first dip the bread that does not have a hole in it into the batter, covering both sides, and place on the griddle. Now dip the bread pieces for the egg in a hole into the batter, being careful with these pieces so the weight of the batter doesn't break the bread. Place these pieces on the griddle also. Dip the leftover shapes from your cutouts, if using, and place on griddle. Let all the bread griddle for a couple minutes until you can tell they're browned but not burning.
- Using a good-sized spatula or pancake turner, flip all the bread. I quickly add a little more butter to the griddle as I'm flipping the toast for more good browning, flavor, and to ensure nothing sticks. See Note 1 for how to easily do this. At least add more butter to the griddle for the pieces that will get the eggs.
- To ensure egg shells don't get into your eggs that are going in the holes, break one egg into a small bowl and then gently tip the egg into the bread with the hole. Repeat with the second egg into the other piece of cut-out bread.
- By now, the regular slices of French Toast and extra shaped pieces should be well toasted on the second side. Remove them from the griddle and place on a baking sheet covered with a wire cooling rack and put into the oven to keep hot while the eggs finish.
- Once you see the bottom of the eggs becoming white, about 3 minutes, carefully but quickly flip the egg-in-the-hole bread pieces on the griddle to finish cooking the eggs to your desired doneness. About two minutes on the second side for over-easy, depending on your griddle.
- Remove the French toast pieces from the oven to individual plates, two per person, then top each plate with an egg-in-the-hole piece of French toast. Serve topped with warm syrup and berries.
Notes
- To easily add more butter to the griddle as you flip your French toast, partially wrap about a tablespoon of butter in a paper towel. Hold onto the paper towel and just kind of wipe the butter onto the griddle where the bread is going to go. Alternately, you can just stab a hunk of butter with a fork and move it around the griddle as you flip the bread, but you need to move quickly so the butter doesn't melt in one spot of the hot griddle before you've flipped all the pieces.
6 large ripe strawberries, washed and dried
Parchment for letting the chocolate-covered strawberries harden
2 Sandwich-size plastic bag for piping the writing on the plate
Optional, about 1/2 cup white chocolate chips to melt for adding white hearts or design to the finished dark chocolate-covered strawberries. 1.Melt the chocolate wafers according to package directions. I used the entire package for large strawberries and writing on the plates. 2. Once the chocolate is ready, hold the green leafy top and dip the strawberry into the chocolate, remove and hold above the chocolate to let the excess drip back into the bowl. Place the strawberry on its side on the parchment. Continue until all the strawberries have been dipped. 3. To write on your plate with some of the melted chocolate- If necessary, place the bowl of chocolate back in the microwave and heat for another 30 seconds to make sure it's pour-able. Place the remainder of the melted chocolate into a sandwich bag, push all the chocolate into one corner of the bag and snip a tiny piece out of the corner. Holding the bag like a fat pen, "write" your design onto the plates. 4. If you're adding some white chocolate decorations to the strawberries, melt the white chocolate chips in the microwave in the same manner you melted the dark chocolate. Pour the melted white chocolate into a sandwich bag, push all the chocolate into one corner of the bag and snip a tiny piece out of the corner. Holding the bag like a fat pen, "write" your design onto the chocolate covered strawberries. You can add hearts, or just drizzle white stripes back and forth across the strawberries.
Nutrition
Serving: 3slices | Calories: 350kcal | Carbohydrates: 45g | Protein: 19g | Fat: 10g | Saturated Fat: 3g | Trans Fat: 1g | Cholesterol: 279mg | Sodium: 562mg | Potassium: 272mg | Fiber: 4g | Sugar: 5g | Vitamin A: 513IU | Vitamin C: 1mg | Calcium: 161mg | Iron: 5mg