
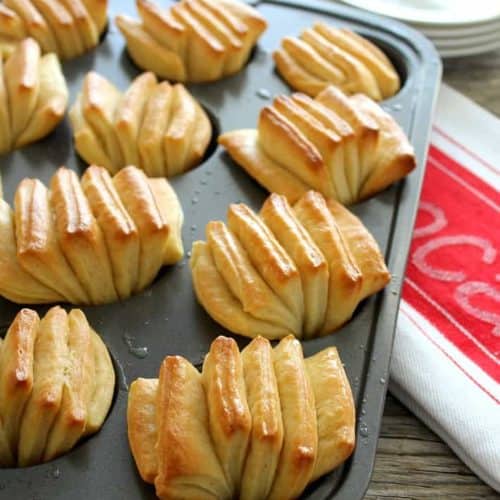
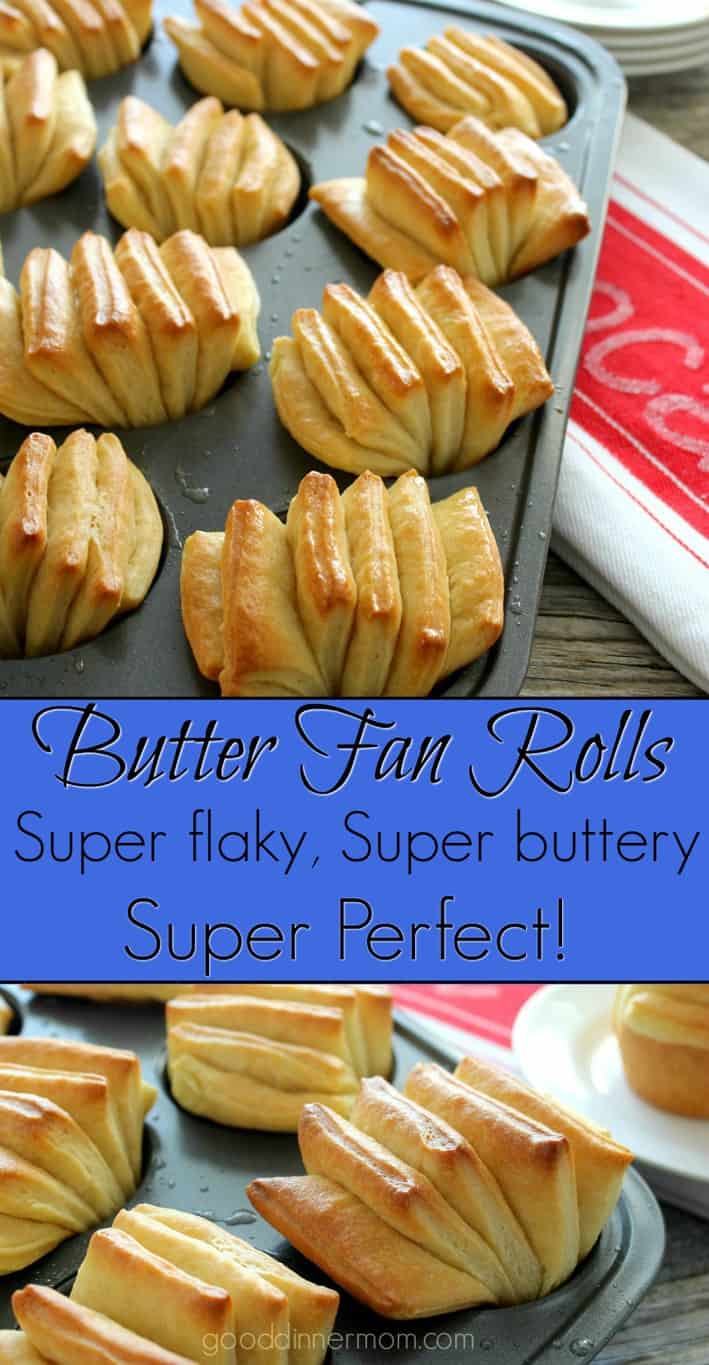
Butter Fan Rolls are easy to make with these step by step instructions and illustrations. Flaky, buttery, and tender. And beautiful.
When it comes to turning out truly made-from-scratch, flaky, tasty, homemade rolls… My name NEVER comes to mind among friends or family for being good at such a thing. I have two friends Tiffany and Amanda, who both can whip up amazing rolls from scratch. Tiffany is known for poofy, pillowy, Parmesan rolls, and Amanda makes super-cute and buttery, knot rolls. Well, today… To-day!! I am throwing myself out there to say “I’ll bring the rolls!” Because these Butter Fan Rolls are amazing, and I made them. In the past, my rolls had to start out with refrigerator biscuits, or freezer rolls, like in this Savory Monkey Bread beauty or Incredible (truly) Cheese Bombs. So, if you’re like me and don’t do homemade rolls, especially anything fancy and pretty… you have to give Butter Fan Rolls a try.
Why You’ll Love This Recipe
-
Beautifully soft and layered: The enriched dough—made with warm milk, egg, and plenty of butter—bakes up tender, fluffy, and irresistibly pull-apart.
-
Impressive fan shape (that’s easier than it looks): Stacking thin, butter-brushed strips of dough creates natural layers that fan out as they bake, giving you bakery-style rolls with minimal effort.
-
Buttery flavor in every bite: With softened butter kneaded into the dough and melted butter brushed between layers and over the top, these rolls deliver rich, buttery goodness throughout.
-
Mostly hands-off: While the dough rises, you’re free to prep the rest of your meal. The shaping is simple, and the oven does the rest.
-
Perfect for any occasion: Elegant enough for the holiday table, but easy enough for weeknight dinners or Sunday supper.
-
Delicious warm or room temp: They’re fantastic straight from the oven, and they reheat beautifully if you want to make them ahead.
I hate to admit it but I took on this recipe expecting to fail (Not how you should approach any new challenge, I know better). But in spite of my defeatist attitude, these rolls would not be deterred and they turned out golden, flaky, soft, and special looking. Here’s what you need to know-
Butter Fan Rolls do take some time to prepare, so plan ahead. Read through the recipe and make sure you have your measuring tools and cutting knives, etc. The rolls will rise twice, once in the mixing bowl, and a second time after they’re cut and stacked in the muffin tin. This recipe came to me in the latest edition of Cook’s Country. I didn’t change the recipe at all, but have a few tips for you to point out further than was written in the issue.
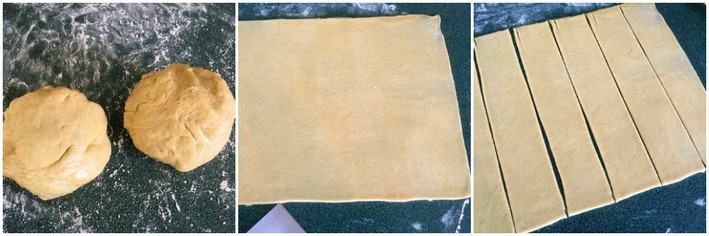
The recipe takes about four hours start to finish, however only about 45 minutes of it is active time. Once the simple ingredients have mixed in your stand mixer until almost smooth, let the dough rise about 1 1/2 hours until it has doubled in size. Divide it into two equal balls, then follow these easy instructions (this information is more detailed in the printable recipe):
Roll one of the balls out and cut it into a rectangle. Your dough will be pretty darn thin and if you lose a good amount of the dough when cutting to measurement, don’t worry about it. Cut the rectangle into six strips.
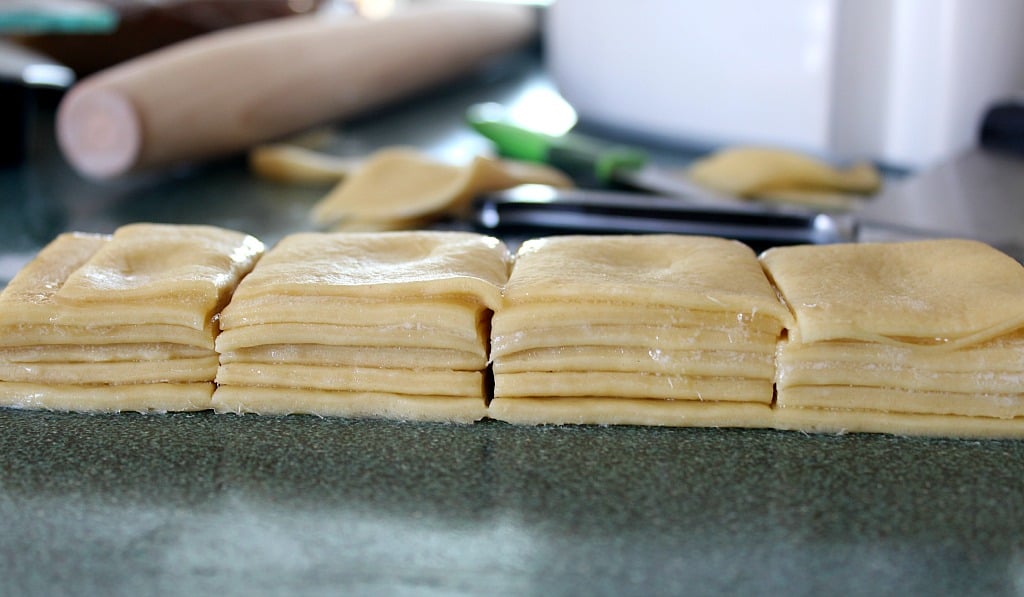
Now, you’re going to brush melted butter on the first strip and then place its neighbor on top. Butter that strip as well, then add the next strip on top of the others. Continue to stack and butter the strips until you get to the last strip. It will go on top and will not get butter.
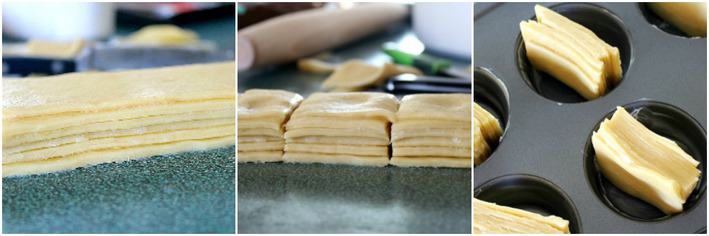
After you have your stack of buttery strips, use a very sharp knife to cut the strips into 2-inch stacks. Put the stacks cut side up, into a buttered muffin tin. Repeat with second ball of dough.
A quick note about what made me expect this recipe to fail: In order to get the 15×12-inch rectangle, I was really, really, thinning out the dough and thought I’d made it too thin. Also, Cook’s Country recipe stressed in their instructions not to over-flour the counter, I was sure the strips were going to stick/break when I tried to lift them. But thanks to all the butter in the dough during mixing, it’s pretty easy to lift. Also, a couple of my strips kind of shrunk up on the end as I was stacking them. This weird, uneven stack still raised up and baked into a perfectly respectable roll to be proud of, so don’t worry if that also happens to you. In other words, don’t expect to fail!
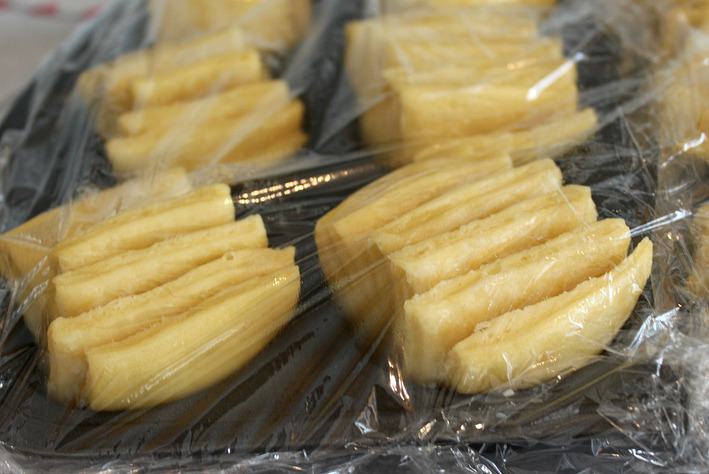
At this point, the stacks get covered with plastic and will sit for another 1 1/2 hours until they rise enough to fill the muffin tins. All you do now is bake them in the oven until golden brown. Be sure to place your oven rack one place above middle.

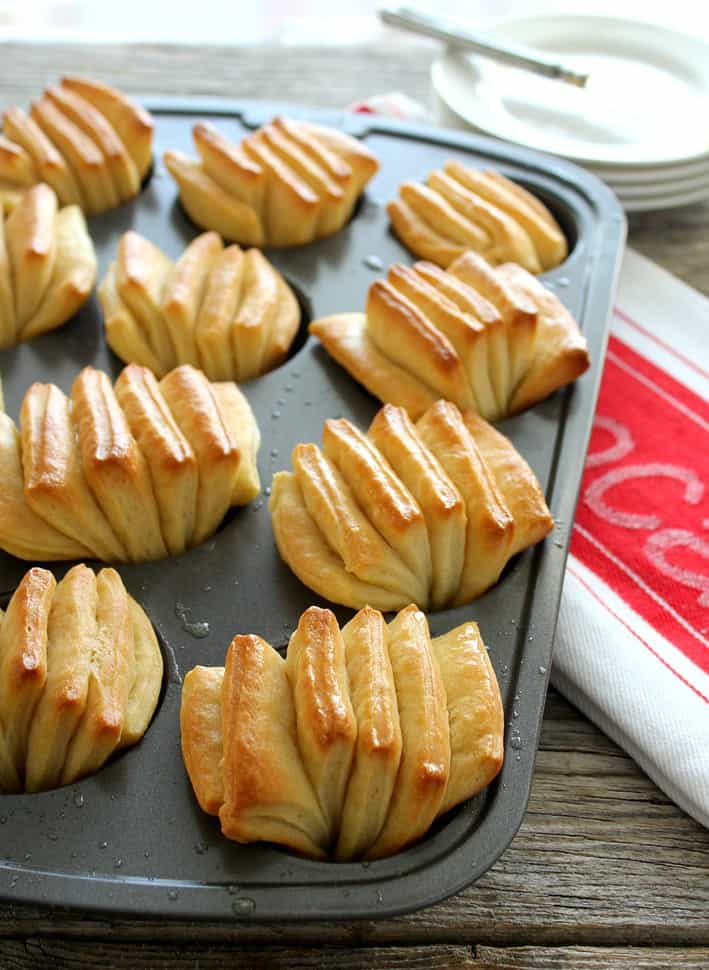
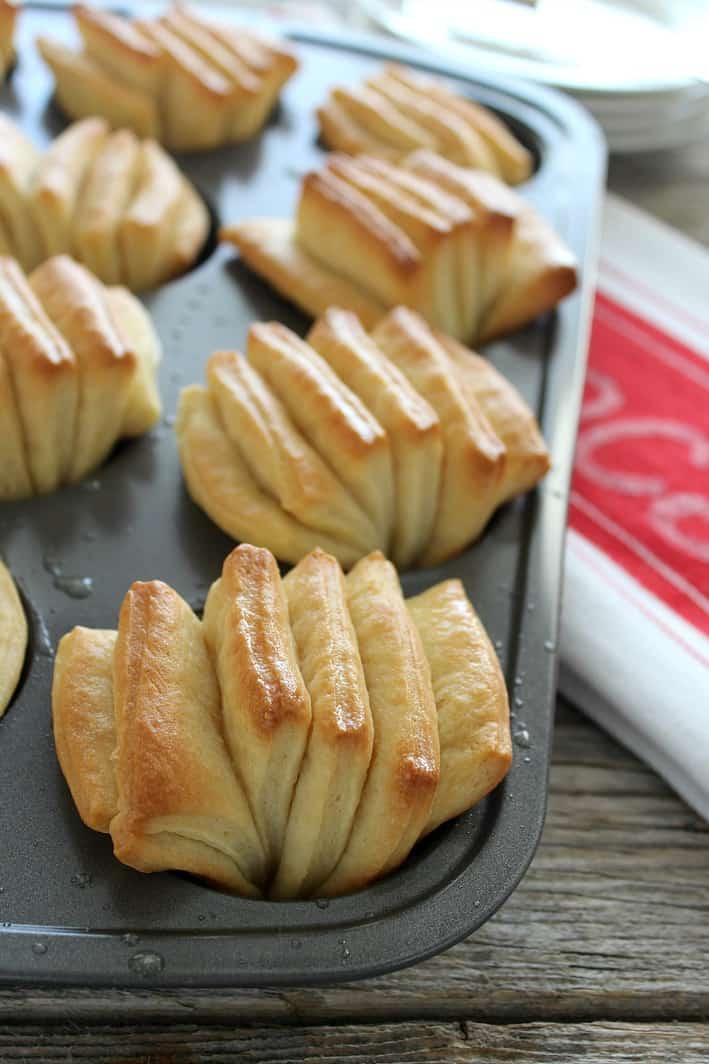
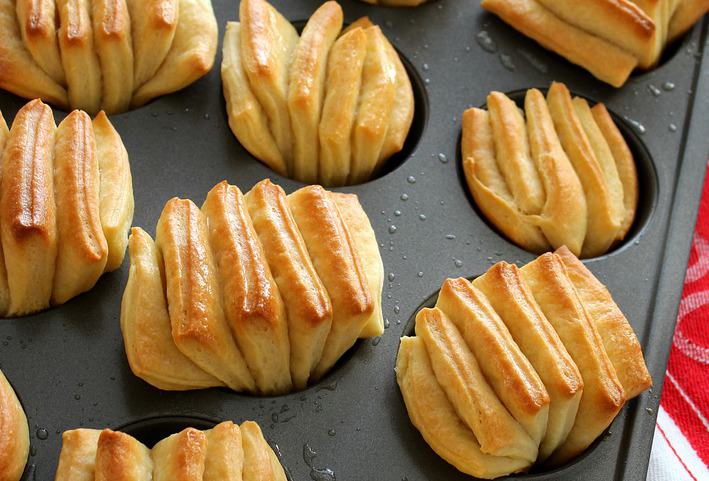
Look at these golden, fancy, buttery, flaky, tender beauties! I must admit I’m pretty proud of myself. My husband and son loved them so much they threatened me to NOT share any with my other taste-testers, as I usually do. But when my awesome friend Kim offered me a huge helping of homemade chili, corn souffle’ and a bottle of red wine in exchange for rolls, which ended up being probably the best chili I’ve ever had (I’ll be sharing that recipe with you!)… Needless to say, she got several rolls and I had to promise Dave and Ryan I’d make them again today this week.
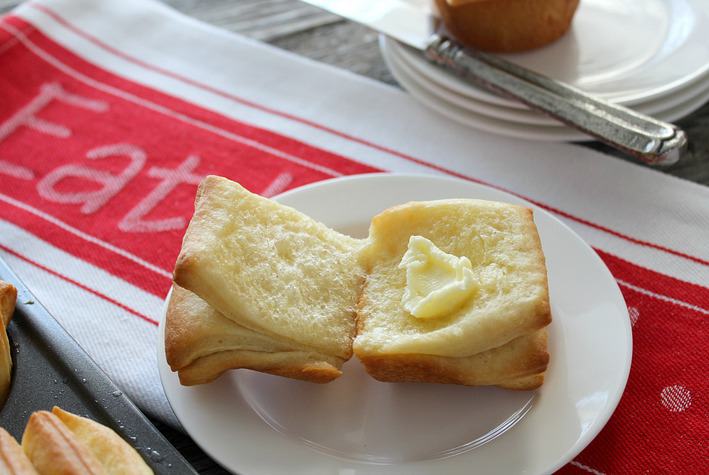
Look how easily the fans pull apart and see how soft and tender they look. The flavor is even better, almost creamy and of course, buttery. You really should try these soon because I’m serious when I say, if I can make them, anyone can. And to those of you who’re reading this and saying “bread is not that hard!” as I’ve been told before, by my own daughter, no less… I’m finally beginning to believe you.
Notes & Tips
-
Measure flour lightly: Spoon and level your flour rather than scooping. Too much flour can make the dough dense and harder to roll out thinly.
-
Don’t over-flour the counter: A lightly floured surface keeps the dough from sticking without toughening it. Too much flour makes rolling and stacking tricky.
-
Use room-temperature butter: Softened butter incorporates more easily into the dough, giving you a smoother, silkier texture.
-
Keep the strips aligned: When stacking the long strips, square them up as best you can. This helps the rolls rise evenly and fan out beautifully.
-
Rotate the pan while baking: A halfway turn ensures even browning so each roll gets that gorgeous golden top.
Serving Suggestions
-
Holiday dinners: These are a showstopper on Thanksgiving or Christmas tables and pair beautifully with turkey, ham, or roast beef.
-
Sunday comfort meals: Serve warm with soups, stews, or a cozy pot roast. Their soft texture is perfect for dipping.
-
Brunch boards: Add them alongside quiche, fruit, and jam for a delicious morning spread.
-
Butter and spreads: Offer softened butter, honey butter, or your favorite jam so guests can enjoy the flaky layers.
-
Leftover magic: Split and toast for breakfast or serve with leftover turkey and cranberry sauce for mini sandwiches.
-
These soft, buttery Fan Rolls are tender, layered, and easier to make than they look. A simple stacking method creates beautiful pull-apart rolls perfect for holidays, Sunday dinner, or any special meal.
Butter Fan Rolls
Ingredients
- ¾ cup warm milk, (110 degrees)
- ¼ cup sugar
- 1 large egg plus 1 large yolk, (room temperature)
- 1 Tablespoon instant or rapid-rise yeast
- 3 ½ cups all-purpose flour
- 2 teaspoons salt
- 8 Tablespoons unsalted butter, cut into 8 pieces and softened, plus 4 tablespoons unsalted butter, melted
Instructions
- In bowl of a stand mixer, combine ¾ cup warm milk, ¼ cup sugar, 1 large egg and 1 large yolk, and 1 Tablespoon instant or rapid rise yeast and let sit until foamy, about 3 minutes. Add 3 ½ cups flour and 2 teaspoons salt. Fit stand mixer with dough hook and knead on medium-low speed until dough is shaggy, about 2 minutes.
- With mixer running, add the 8 Tablespoons softened butter 1 piece at a time until incorporated. Continue to knead until dough is smooth, about 5 minutes. Transfer dough to greased large bowl, cover tightly with plastic wrap, and let rise at room temperature until doubled in size, about 1 ½ hours.
- Grease 12-cup muffin tin. Press down on dough to deflate and transfer to lightly floured counter (do not over flour counter). Divide dough into 2 equal balls (about 1 pound each). Roll one dough ball into 15 by 12-inch rectangle with long side parallel to counter’s edge. This will be very thin.
- Using pizza wheel, cut dough vertically into 6 (2 ½-inch-wide by 12-inch-long) strips. Brush tops of 5 strips evenly with 1 tablespoon melted butter, leaving 1 strip unbuttered. Stack strips squarely on top of each other, buttered to unbuttered side, finishing with unbuttered strip on top.
- Using sharp knife, cut stacked dough strips crosswise into 6 equal stacks. Place stacks, cut side up, in each of 6 muffin cups. Repeat with remaining dough ball and 1 tablespoon melted butter. Cover tin loosely with plastic and let dough rise at room temperature until doubled in size, 1 ¼ to 1 ½ hours. Adjust oven rack to upper-middle-position and heat oven to 350 degrees.
- Bake until golden brown, 20 to 25 minutes, rotating muffin tin halfway through baking. Brush rolls with remaining 4 Tablespoons melted butter. Let cool in muffin tin for 5 minutes. Remove rolls from muffin tin and transfer to wire rack. Serve warm or at room temperature.
Notes
Notes & Tips
- Measure flour lightly: Spoon and level your flour rather than scooping. Too much flour can make the dough dense and harder to roll out thinly.
- Don’t over-flour the counter: A lightly floured surface keeps the dough from sticking without toughening it. Too much flour makes rolling and stacking tricky.
- Use room-temperature butter: Softened butter incorporates more easily into the dough, giving you a smoother, silkier texture.
- Keep the strips aligned: When stacking the long strips, square them up as best you can. This helps the rolls rise evenly and fan out beautifully.
- Rotate the pan while baking: A halfway turn ensures even browning so each roll gets that gorgeous golden top.
Recipe adapted from Cook’s Country magazine.


Hi Sally,
I love this recipe, but was wondering if it’s possible to add mashed potato to the recipe.
If you can, how much would you use?
Hi Elizabeth, I have no experience with adding mashed potato to this roll recipe so I’m sorry, I can’t help you.
Going to give these a try tomorrow!! BUT when I bumped the recipe up to 24, I notice that the last 4 extra tablespoons of butter didn’t change to 8…is that correct? Everything else doubled but that…
Curious baker in Seattle
Hi again Caryn, I replied to your email but I’ll reply here too, in case and to help others. The final 4 tablespoons in the recipe as written are for melting and brushing on the rolls. Since that instruction is in the notes part of the ingredients, I think the recipe calculator can’t catch it. Let me know if you need any other help! I gave you my cell number in my email reply and you can also text me for faster reply.
I make homemade bread 2-3 times per week for our family of 5. This is their favorite. I love them because it’s pretty easy to make and the presentation is lovely. Thank you Sally, they’re delicious!
I’ve never written a review before, but I couldn’t pass up a chance to say thank you for this recipe. I’ve been looking for a recipe like this for a while now. Theses rolls turn out perfect every time!! We just LOVE them!
Wow! I have tossed all my other roll recipes out. THIS IS IT! The ONLY recipe you will need from now on.
AMAZING rolls! And kind of fun to eat 🙂 I added a cinnamon/sugar mix in between some of the roll layers for my kids and we all loved both the regular and cinnamon. A keeper for us!
Yummy!! Highly recommend especially for the begginer bread bakers. The rolls came out fluffy, soft, and delicious! I followed the exact recipe but did add honey with my butter on top after baking.
This is a great recipe! Very easy to do and the whole family loved them.
I was so excited to try these rolls, but in the end, they were dense and without the buttery flavor I was so hoping for. Everything came together beautifully. Following your recipe exactly, a lovely dough was produced that rolled-out without effort. They rose well both times and were baked until just done 20 minutes. Everyone was in shock when we sat down to dinner, peeling the first layers off of our warm rolls, only to discover that they were neither flaky or buttery. So disappointed.
Michelle, I’m so sorry to hear this. I’ve never had a problem with them not being buttery and flaky. Do you think you could’ve rolled them too much? Thanks for the input and again, I’m sorry the rolls didn’t work for you, especially for all the work that goes into them. 🙁
I can’t wait to give these a try. Thanks for the encouragement. Yours look so nice. Glad you posted.
Hi Rebecca, Let me know how they turn out for you! Thanks for the kind words.
I just baked these…very buttery, moist, tender, flaky w/slight crisp to outside. : ) Mine didn’t turn out as pretty as in the pictures. Rose really fast, baked fast and tasted wonderful. This is a keeper. Thank you for sharing.
Hi Marilyn, I’m glad they tasted great for you which is most important over “pretty”. Hopefully with a tiny bit of practice they’ll look picture perfect next time. Thanks for taking the time to comment. It means a lot.
These are so pretty! Have you tried them with a glaze on top or would they get soggy?
Those are absolutely gorgeous!! I’m sure they taste even better than they look!!