
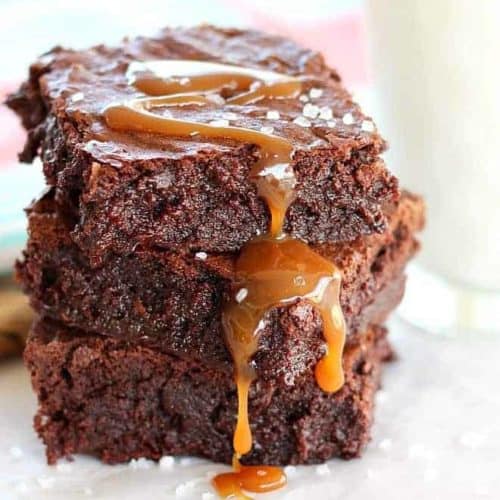
The ultimate Salted Caramel Brownies — fudgy, chocolatey, and layered with smooth salted caramel. Step-by-step photos included!
Why You’ll Love This Recipe
-
Rich and fudgy texture – These brownies bake up with that perfect dense, chewy center and glossy top that true brownie lovers crave.
-
Homemade salted caramel – The buttery caramel layer adds a smooth, gooey contrast to the deep chocolate flavor. (You can use store-bought caramel too — no judgment!)
-
Sweet and salty perfection – A sprinkle of flaky sea salt balances the sweetness and makes every bite irresistible.
-
Easy to follow – The recipe is written with clear, step-by-step instructions so even first-time bakers can make brownies that taste bakery-quality.
-
Crowd-pleasing dessert – Whether it’s for a potluck, holiday, or a weeknight treat, these Salted Caramel Brownies always disappear fast.
Chocolate lovers and caramel fans, this recipe is for you. These Salted Caramel Brownies are the perfect mix of rich, fudgy chocolate and buttery homemade caramel — truly the best salted caramel brownies you’ll ever bake. Every bite has that gooey caramel swirl, a deep cocoa flavor, and just enough flaky sea salt to balance the sweetness.
It took me a few tries to perfect the texture and the balance of caramel to brownie, but this final version is fool-proof. The detailed instructions below might look long, but I’ve written them that way so you’ll have success from the very first batch. Whether you make your own salted caramel or use store-bought, these brownies turn out irresistibly rich and bakery-worthy every time.
Now put on some music and an apron and let’s get started-
Ingredients in Salted Caramel Brownies
For the Salted Caramel
-
1 cup granulated sugar
-
6 tablespoons unsalted butter, room temperature, cut into thirds
-
½ cup heavy cream, room temperature
-
1 to 1½ teaspoons sea salt (if using table salt, use slightly less)
For the Brownies
-
12 tablespoons unsalted butter, melted (1½ sticks)
-
1½ cups granulated sugar
-
2 large eggs
-
2 teaspoons vanilla extract
-
½ teaspoon salt
-
¾ cup unsweetened cocoa powder
-
½ cup all-purpose flour
-
½ cup salted caramel (or use purchased caramel sauce if preferred)
-
Coarse salt, for sprinkling on top (optional)
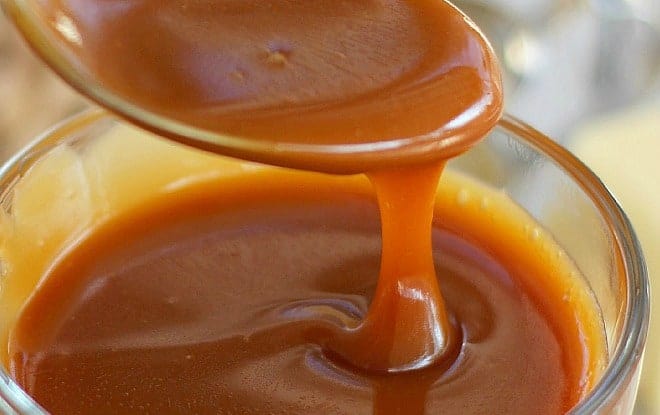
First make the caramel. I include the full recipe in this printable, but also have step-by-step photo instructions for the caramel sauce here. Alternately, you could use purchased caramel sauce.
While the caramel is cooling, line a baking dish with parchment paper. This will help you easily remove the brownies from the pan after they’ve cooled.

This brownie batter is super simple and perfectly thick and chocolate-y. Made quickly by hand or with a stand mixer.

Assemble the batter and caramel sauce-
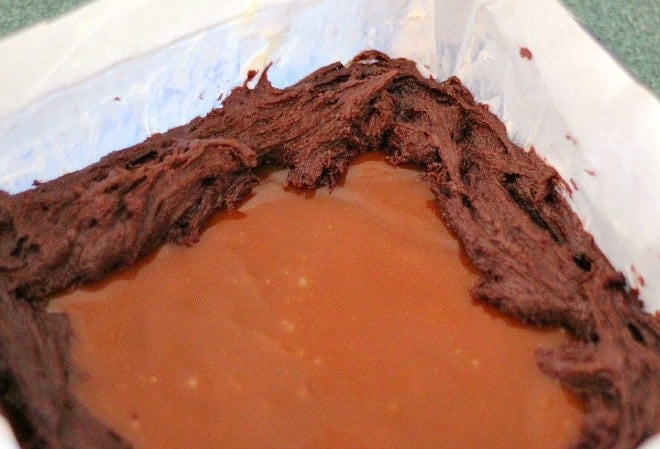
The assembly process is what I really want to show you. Spread about half the brownie batter evenly to the sides of the dish, spreading the batter a little up the sides.

Spread the caramel sauce over the batter. If you made the caramel sauce ahead of time and it has become too thick to spread, heat it in the microwave for about 5 to 8 seconds and it will spread easily. Do not spread the caramel all the way to the edge.

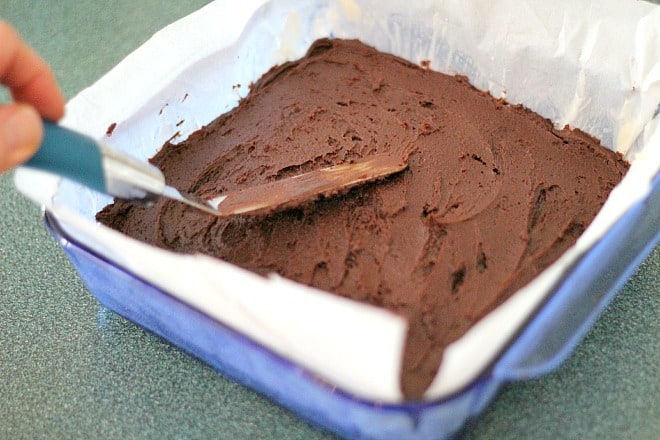
Begin to cover the caramel with the remaining batter. I place a bit of batter around the edges first to ensure that I don’t inadvertently spread the caramel out to the edge of the baking dish.
The remaining batter can now be gently dropped onto the rest of the mixture and then spread to cover.
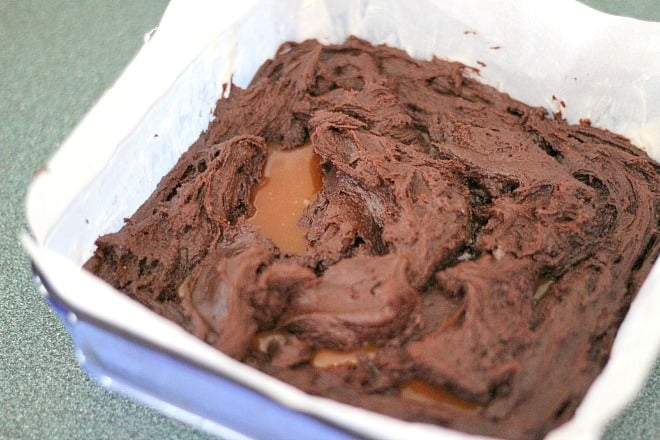
Using a spatula, continue covering the caramel. If a bit of caramel still shows, it’s okay, the batter will cover it as it bakes.
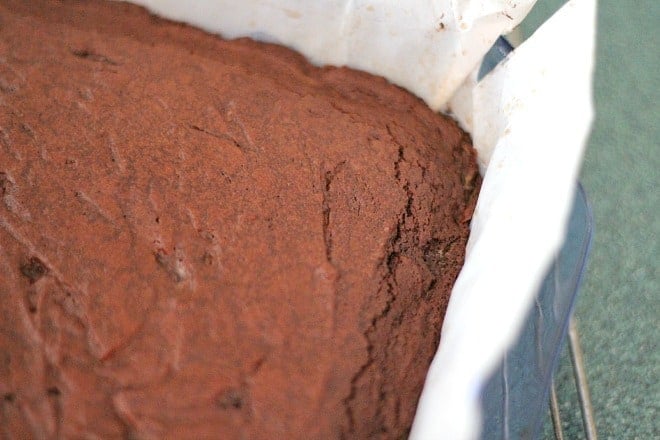
Let the brownies cool for a good hour after baking. You can then easily lift them out of the pan by pulling up on the parchment.
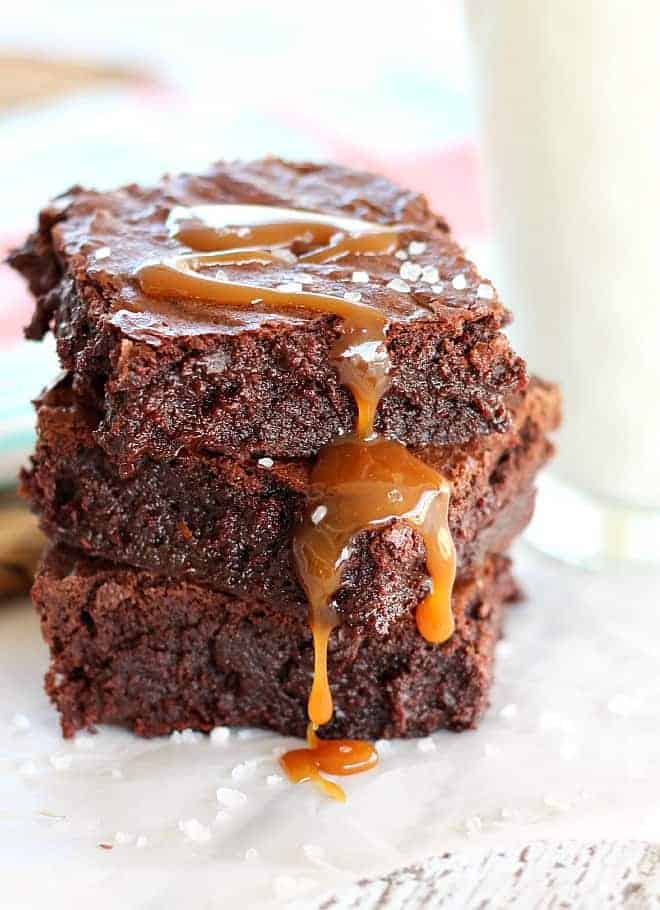
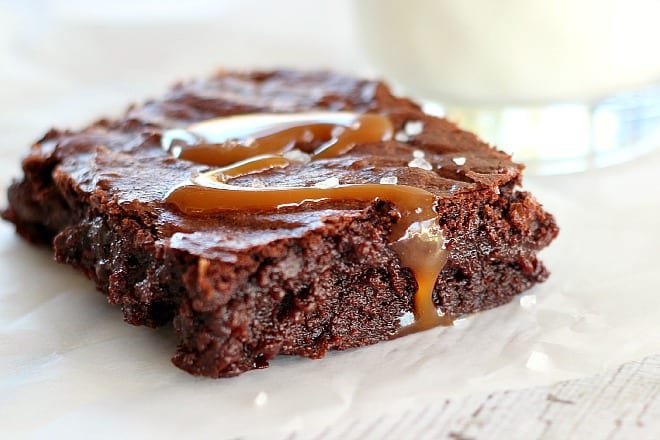
After cooling, get these chocolate beauties cut and served! The caramel has melted throughout, ensuring a moist (understatement), flavorful brownie. Surprisingly, even though they look it, they are not too rich at all. Perfectly sweet and not too salty. Just right. The salted caramel brownies are very easy to make and can be customized with more or less caramel and over-the-top amounts of chocolate, depending on what you’re looking for.
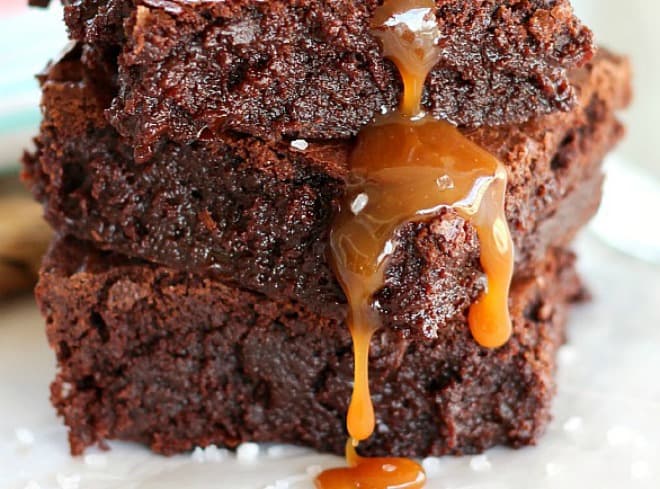
Since the caramel kind of disappears into the center of the brownie, I like to drizzle a bit more over each brownie, just for extra excitement. Then add a few flakes of coarse salt over the top if you like.
Salted Caramel Brownies FAQ
Can I use store-bought caramel sauce instead of homemade?
Yes! If you’re short on time, a good-quality store-bought caramel works beautifully. Just use about ½ cup in the center layer and save a little extra for drizzling over the top after baking.
Do I have to add the sea salt to the top?
Not necessarily — but the salt enhances both the chocolate and caramel flavors. If you prefer a sweeter brownie, skip the sprinkle on top or use a light hand.
Can I make these salted caramel brownies ahead of time?
Absolutely. Once cooled, cover the pan tightly and store at room temperature for up to 2 days, or refrigerate for up to 5 days. The flavor actually deepens after resting overnight.
How should I store salted caramel brownies?
Keep brownies in an airtight container. For a softer, fudgier texture, store at room temperature. For firmer, chewy brownies, refrigerate them and let sit at room temp for a few minutes before serving.
Can I freeze salted caramel brownies?
Yes — they freeze well! Wrap each brownie in parchment and store in a freezer bag for up to 3 months. Thaw at room temperature and drizzle with fresh caramel before serving for that just-baked flavor.
If you love a dessert that’s equal parts indulgent and comforting, these Fudgy Salted Caramel Brownies are it. The combination of deep chocolate flavor, buttery caramel, and a touch of sea salt makes every bite unforgettable. Whether you bake them for a special occasion, share them at a potluck, or enjoy one warm with a scoop of vanilla ice cream, this homemade brownie recipe will quickly become your go-to. One bite and you’ll see why they’re the best caramel brownies around.
Fudgy Salted Caramel Brownies
Ingredients
For the Salted Caramel:
- 1 cup granulated sugar
- 6 Tbsp unsalted butter room temperature, cut into thirds
- ½ cup heavy cream room temperature
- 1 to 1 ½ tsp sea salt
For the Brownies:
- 12 Tbsp unsalted butter melted (1 ½ sticks)
- 1 ½ cups sugar
- 2 eggs
- 2 tsp vanilla extract
- ½ tsp salt
- ¾ cup cocoa powder
- ½ cup all-purpose flour
- ½ cup of the salted caramel optionally, use ½ cup purchased pre-made caramel sauce
- Coarse salt for sprinkling on finished brownies optional
Instructions
Make the Salted Caramel:
- In a medium saucepan over medium-high heat, heat the sugar, stirring occasionally with a rubber spatula. The sugar will clump at first, then melt into a deep amber caramel, about 5 minutes.1 cup granulated sugar
- Remove from heat and carefully whisk in the butter. The mixture will bubble rapidly.6 Tbsp unsalted butter
- Add the heavy cream and sea salt, whisking constantly until smooth. Return to medium-high heat for 20 seconds, stirring continuously.½ cup heavy cream, 1 to 1 ½ tsp sea salt
- Let caramel cool for at least 15 minutes before using. If it thickens too much, microwave for 10–15 seconds and stir.
Make the Brownies:
- Preheat oven to 350°F. Lightly butter an 8x8-inch baking dish. Line with two overlapping strips of parchment paper, leaving overhang on all sides for easy removal. Lightly butter the parchment.
- In a medium bowl, stir together melted butter and sugar until combined. Add eggs, vanilla, and salt. Stir until smooth, then fold in cocoa powder and flour just until combined.12 Tbsp unsalted butter, 1 ½ cups sugar, 2 eggs, 2 tsp vanilla extract, ½ tsp salt, ¾ cup cocoa powder, ½ cup all-purpose flour
- Spread half the brownie batter into the prepared pan.
- Spoon about ½ cup salted caramel over the batter, spreading gently but leaving a small border around the edges.½ cup of the salted caramel
- Top with remaining brownie batter, covering as much caramel as possible.
- Bake for 30 minutes at 350°F. Reduce heat to 325°F and bake another 10 minutes, or until the center is just set and a knife comes out with a few moist crumbs.
- Cool completely before cutting into 9 brownies. Drizzle with extra caramel and sprinkle with flaky sea salt, if desired.Coarse salt for sprinkling on finished brownies
Notes
- Store-bought caramel sauce works well here. Warm slightly before using so it spreads easily.
- For extra fudgy brownies, avoid overbaking. The center should still look slightly soft when removed from the oven.
- Flaky sea salt gives the best finish and balances the sweetness beautifully.
- For clean slices, chill brownies briefly and wipe the knife clean between cuts.


AWESOME! officially my permanent brownie recipe. Very chocolatey/gooey brownie. Well done, Sally! They are perfect!
Oh. My. Goodness. I made these today and they are everything I hoped the would be. My first time making caramel and it certainly will not be my last, I had a hard time not eating them all on my own!
Now those look sinful!!! I cannot wait to try these!! My husband LOVES salted brownies and I just know your recipe will meet his standards. Thank you so much Sally!
Thanks, Daylene, They really do fit the bill for “sinful”. Love how you think! 🙂
I just discovered your blog and am making one of your recipes almost every day! This is next for sure! Looks too good not to try.
Wow, thanks Amanda! Glad you’re here and thank you for your nice comment. 🙂
I couldn’t stop eating these and my husband would eat himself into a coma! YUM! Very delicious Sally Thank You!
Haha! I love this Britt and I totally get it. Thanks for your sweet comment!
Hi o cannot wait to try this recipie! Looks amazing thank you for uploading. I just wanted to ask for your advice.
I want to add a few tablespoons of brewers yeast (dry powder) to the batter how can I adjust the recipie so that the brownies are still gooey?
Hope to hear from you soon x
Hi Layla, Unfortunately, I have zero information on this. I’ve never added brewer’s yeast to any of my recipes so I’m not sure how it will affect them. That being said, the brownies are super moist so it would probably take a lot of any dry ingredient (and/or too long in the oven) to dry them out. I can’t even guess here, but maybe experiment with a little bit to begin with. Sorry I’m not more help here.
Do you refrigerate the extra caramel sauce?
Hi Carla, Yes you should refrigerate any extra. Thanks for your question and I hope you like the brownies.
These brownies are amaaaaazing, thank you for sharing the recipe! One question, can this recipe be doubled for a bigger pan? Thanks!
Hi Mie, Yes, I’ve doubled the recipe several times. Glad you liked them and thanks for stopping by!
These were super yummy. My new fav. I love the caramel sauce and mixed with the brownies is divine. One question- when I mixed my brownies up, in the mixing state they did not look the same as your pictures, they were much more runny. I followed all the amounts and directions. I just wanted to check if it really is only 1/2 cup flour.
Thanks for a new family favorite.
Michelle, Yes 1/2 cup flour is correct. I’m not sure why your batter would be less thick but I’m so glad your family loved them! Thanks so much for your comments (Sorry for late response. We were out of town and out of internet access area for a few days).
wowwie! My mouth is watering just from the pictures! These are a MUST for my brownie-loving husband